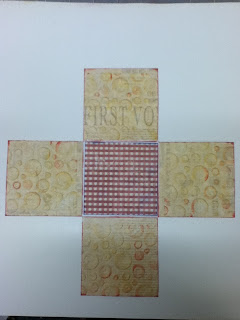
Take one sheet of 12 x 12', i used portabella road.
Mark it into 9 equal squares with a pencil each one will be 4" square. like a grid.
cut out the four corner squares carefully and retain, it will now look like the cross shape below.
turn this over and then stick the retained cut off squares on the four edge squares , they will fit spot on !
i then put a red check square to fit and cover the centre.
the next sheet i cut to 10.5" square and you need to divide it into equal squares as the first one you did , these are 3.5 each
Then cutting out and retaining the edge squares as before , turning the whole thing over and sticking the cut out bits onto the
edge squares to decorate as before, add the red checked square in the centre too.
do exactly the same on a third sheet, this time its a 9" square and the penciled squares will be 3" each
sticking the cut out squares on the other side as illustrated.
as the paper was plainer on this one - i also embossed the cut out squares with the buttons tri boss folder before sticking them down and also ran a red ink pad softly over the surface to just distress a little bit.
i inked all the edges in red ink and then put silicone glue onto the biggest cross centre red check square, stuck the middle cross onto it and then do the same with the smallest cross too.
it will look like this image below.
I then inked all edges in red and added photos and embelishments to each inside flap. i used some of the glittered portabella road designer die cuts under the photos. I used buttons and tiny bows also from the porabella road range .
finally adding a small die cut from the 6 x6 " portabella road paper pack & to this i added tiny gold letters to say Queen Elizabeth diamond jubilee and 60
For the lid, i used some complementary blue card measuring 5.25" square, score an inch all around the edges. fold and snip the corners stick down to form a box lid. I used the large die cut from the 12 x 12 " portabella road paper pack to stick centrally on the box lid adding large bloomer flowers with edges inked and glittered. fixed with a red brad . i stuck red ribbon around the sides of the lid with double sided tape, tying up in a little knot at the edge.
I hope you like it and will have a go, much easier than it seems.
The lid also has Eden and Isaac, the names of my daughters twins, born this Jubilee year and 2012


